How to Change Your ALFA™ Oven Fuel Type
All ALFA™ gas ovens, besides the MODERNO Portable, can run on liquid propane or natural gas. In fact, they are shipped with all the necessary components to run on either fuel type. That said, depending on which ALFA™ oven you buy, it's going to be set up to run on either propane or gas out of the box, and shipped with the components to switch to the other fuel type. The steps below are what is required to change from one fuel type to the other.
You can follow these graphical steps to complete the conversion or you can jump to the video hat shows the process.
Disclaimer: These steps should only be completed by a professional who is qualified to complete them.

Step 1: Shut off gasPrior to commencing, ensure the gas flow is completely closed. Subsequently, shut off either the gas mains tap or the LPG cylinder. |

Step 2: Detach the gas knobTo detach the gas knob (A), a gentle pull is adequate. Please adhere to the arrow's direction. |

Step 3: Detach the hoseTo disconnect the gas tube (B), utilize a 24 wrench or appropriate pliers. |

Step 4: Remove the casingTo take off the protective casing (C), simply unscrew the indicated screws shown in the photo that secure it to the oven. |

Step 5: Release the burnerTo unlock the burner (D), just take out the screw highlighted in the red circle using a 4mm hex wrench. |

Step 6: Extract the burnerGently withdraw the burner halfway, taking care not to harm the ignition cable (E). |

Step 7: Unplug the ignition cableNow, by turning to the side, you'll have access to the assembly unit, allowing you to disconnect the white ignition cable. Employ tweezers if needed, grasping the black sheath for assistance. |

Step 8: Identify the nozzle you'll be replacingAfter taking out the burner, you'll notice the golden nozzle (F), which requires replacement. |

Step 9: Extract the nozzleTo detach the nozzle, utilize an 11 wrench, unscrewing it in a manner similar to a standard nut. Rotate the wrench from top to bottom. |

Step 10: Unlock the pilot groupTake out the pilot group block (G) to initiate the adjustment of the pilot flame. Simply unscrew the two screws circled in red. |
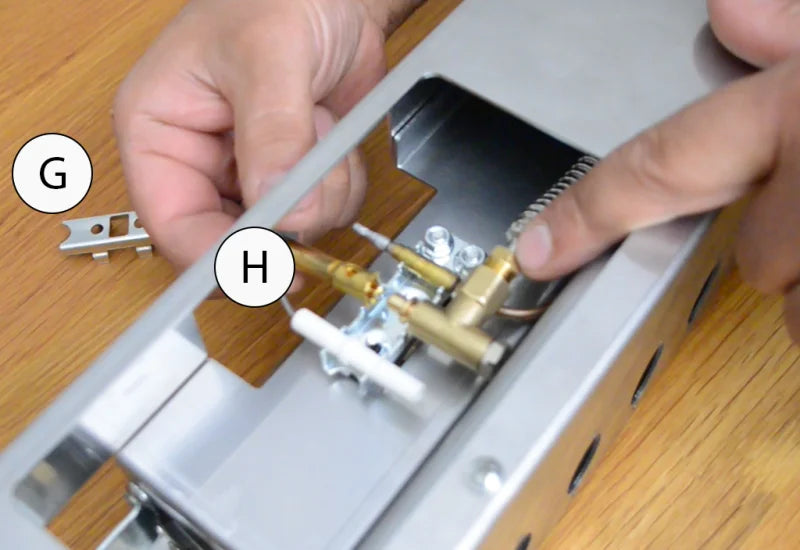
Step 11: Take out the pilot flameAfter removing the stop (G), proceed to take out the pilot flame head (H). |

Step 12: Access the nozzleElevate the pilot flame, then unscrew the cap to access the pilot flame nozzle (L). |

Step 13: Install the new pilot flame nozzleInstall the new pilot flame nozzle by using an appropriate screwdriver to unscrew the existing nozzle (L) and replace it with the new one. |

Step 14: Reestablishing the pilot flameReposition the pilot flame head as illustrated in the enlarged photo. Ensure that the "T" formation created by the openings aligns with the indicated position. |

Step 15: Reinstall the pilot groupAt this juncture, reintegrate the pilot assembly by placing back the block (G) that was earlier removed. Then, follow the steps in reverse from point 7 to point 2 above to reassemble. |
Step 16: Reset the burnerDuring the next startup, inspect for any potential leaks. |
Video Showing Conversion Steps
Disclaimer: These steps should only be completed by a professional who is qualified to complete them.